Posts by Yvette:
Let’s put our hands to welcome… new fabrics!
November 9th, 2010BEWARE: Larger than usual pictures ahead. So that YOU can have a better look at them fabrics!
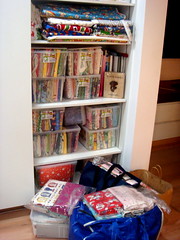
Although I have all but given up on my stash reporting (hey, I need to save something for my crafty new year resolution, eh?), here’s a peak at the newest members of my fabric family.
Of course, its not always BUY BUY BUY, I have been busy stitching too. I spent a back-breaking weekend cutting up some really really cute fabrics and took my time to sew and press the lovelies.
New crayon wallets available in store now. I am listing a couple of new wallets everyday (I can’t spend ALL my time on my crafty habits. A girl gotta work too, yah?). For local buyers, they are SGD$18 (incl. of 8 crayons + 100-page notepad) and delivery is free to a local address! Contact me yvette[at]midnightcrafts.net if you need more info.
May the Force be with me…
November 2nd, 2010Halloween is becoming a fun excuse for me to dress up Benji for our get-togethers with friends. And who says you
can only have fun dressing up little girls?
Last year, we had a fuss-free outfit and Benji was not totally clued in on what was going on!
This year, it was as clear as daylight what he would enjoy being costumed as… I present: Young Ben Kenobi!
I have the Taftc apparel pattern and sewing course to thank for the confidence to work on this project with the Simplicity 3575 pattern. The Dad said that the costume should not have a sash but I included it anyway to keep the layers from getting into the boy’s way.
For fabric, I used this lovely brown Essex Linen that I bought a long long time ago. There are a few learnings from this project:
1) Buy the pattern from the store, instead of purchasing the softcopy. I had to print 41 pages on my printer and used about 2 rolls of tapes taping the pages together. Even then, some lines were wonky. TEDIOUS!
2) The sleeves and robe length were way too long even when I used a XS child size which listed the same measurements as Benji’s.
3) The pattern doesn’t provide overlocking instructions or seam finishing recommendations. I will simply overlock every piece of fabric cut-outs in the future.
4) The sleeves were too long for my Son, and I decided to ‘hem’ the sleeves with the Blind Hem Stitch. I found it much easier to hem the narrower ‘tube’ by hand.
5) For the robe hem, I finally got to use my blind hem footer on the Bernina as it is meant to be used! It was so easy and it really works great on the garment.
Looking forward to next year’s dress-up already! 😀
Goodbye October, Har-row November!
October 30th, 2010Back from a leave of absence from blogging (and also reading crafty blogs :<)
I have good reasons for this lack of interaction, actually.
1) I lost my camera battery charger. No juice, no photos, no show & tell blog posts.
2) Family – my parents (aka day care givers) have been traveling and I had to look after Benji and work from home at the same time.
3) Work – see [Family]
4) TaFtc – That’s Textile and Fashion industry Training Centre to you. I attended a 3-week full time course. It was INTENSE. More about that in a later post.
5) Organising – Been spending some time rearranging my fabric stash, packing, putting away, giving away, etc… Not close to 1/2 way done.
Besides taming the stash situation, there are about 24 other items on my list that are marked ‘URGENT’. But I have dedicated November as my ‘Sewing Month’. Machines are cleaned & oiled, thread and needles are stocked, things are more or less put away. It is time to sew and create!
X-stitching in progress
September 18th, 2010In a bit of a quilting funk now. And of course, in a bit of Blogging funk too.
Been doing LOADS of online shopping though and indulging in my ‘renewed’ handsewing love: Cross stitching.
Back to my ‘counting’ now ;> Ta!
Adding ‘Facebook Like’ button in your blog posts
July 30th, 2010For a few campaigns, clients have been asking about integrating Facebook to their websites and social media communication. And recently, I learned a neat trick from the team and I have started implementing the Facebook Like feature on Midnight Crafts! 😀
This feature is great as it allows readers to ‘like’ the content of your post. And that’s when the magic happens. Your link will show up on your friend’s profile AND this in turn shows up on his friends’ Home Page under ‘news feed’.
There are MANY ways you can incorporate Facebook Like button to your site. And there are lots more widgets to integrate FB with your site and content. This is just ONE way how you can do this. And I feel that this is the easiest method for a non-techie to perform.
So here goes:
Step 1: Compose your blog entry using your blog post
Compose your post with blog engine of choice (word press, blogger, etc), as usual. Remember to save your posts after every paragraphs and after each picture insertion!
Step 2: Go to Facebook and generate code
2.1) Go to: http://developers.facebook.com/docs/reference/plugins/like


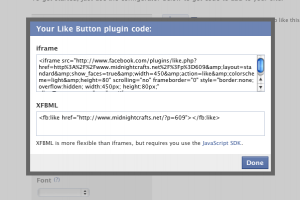
2.3) Click ‘Get Code’.
You will see this pop-up box:


Step 3: Switch to ‘HTML editor’ view in your blog post edit
Back to your word press, blogger, etc. Click on edit on your post as we are going to paste the code in.
Most of us will usually use the ‘Visual’ (if you are using Word Press) or ‘Compose’ (if you are using Blogger/blogspot) view when you are composing your posts.
Now, switch to ‘HTML’ or ‘Edit HTML’. You will see all the HTML codes and tags, instead of ‘bold, italic, images’, etc.
Step 4: Insert Facebook Code
In ‘edit HTML’ view, scroll right to the end of your post.
Right click to paste or press CTRL+V or Command+V the Facebook iframe code to the end of your post.
Click on Preview or Publish and you will see the Like button there!
Test it out to make sure it works 😀
Let me know if you have any questions and if it works for you!


